Showing posts with label Cricut. Show all posts

3/24/12

Destination Blog Hop 3/23-3/24


Welcome to our adventure! We're off to see great things! Perhaps by car, train, or plane, or maybe by boat, no matter what-it'll be a great trip! No pesky security pat downs, or pesky luggage to deal with, or those extra fees that seem to mount up!


You won't need your cameras, or money for gas, but you will want to watch for souvenirs to pick up! So grab your favorite drink and curl up and make yourself comfortable! No need to share your seat unless you've invited guests to take part!


Here at our ports of call, you'll need to leave your comments! Many of them will offer souvenirs (blog candy) and there's lots to be had with our wonderful Travel Director Janet!!

1. A Destination Cricut Cartridge

2. A travel album filled with embellishments to remember your trip

3. Misc. goodies to numerous to mention!

In order to qualify for Janet's candy you need to follow her blog & also leave comments at all the destinations. Everyone worked very hard to make your trip fun so please please please go back and make sure that you have remembered to leave some  love in all the ports.

I would love it if you were ALSO a follower of my blog...I'm getting closer to the magical 200 mark...YEAH!


Here's the entire itenery in case you get lost!

Janet Royer- http://janetscreativeworld.blogspot.com
Cathie W  - http://cathiescafe-scraphappy.blogspot.com/
Liz Mullen - http://scrapiliciouslife.blogspot.com/
Ashley - http://especiallymade.blogspot.com/
Lisa T.- http://bitbythecricutbug.blogspot.com/
Amber - http://pixiperfectcreations.blogspot.com/
Alina- http://neverstopscrapping.blogspot.com/
Angela-http://creativecraftin.blogspot.com/
Tricia ~ http://www.mycrazybubble.blogspot.com/
Lisa - http://handmadewithlove-lisa.blogspot.com/
Michelle- http://craftychelle.blogspot.com/
Jamie- http://www.thesassyprincess.blogspot.com/
Janet- http://janetscreativeworld.blogspot.com/

But leisure at each port and enjoy where you are! Here at my port we're in:
Glacier National Park
I visited GNP a few years ago when I visited a friend who lives just outside the park in Montana. It is SOOO incredibly BEAUTIFUL! Such an experience! Even though it was the 2nd week of April there was still a TON of snow on the ground...So much so that most of the park was closed because the main road was not negotiable & there were too many avalanches. Anyway, I hope you enjoy Glacier National Park as much as I did.


I'm very sorry for the photo quality... :( My camera did not play nice...I will attempt to replace the photos during the day if my camera co-operates...


Thanks for visiting us today!  I love it when people comment on my blog so PLEASE leave me some love...it makes me happy :)

Your next port will be Jamie at http://www.thesassyprincess.blogspot.com/ Please be sure to go see her and give her lots of blog love. 

After you visit Jamie you will return to our wonderful Travel Director Janet:
 http://janetscreativeworld.blogspot.com


Our travel director- Janet will pick the winners of the prizes Monday!

2/10/12

Mixed Media Blog Hop


Welcome ladies to the Mixed Media Blog Hop. This hop will not have a long list because it involves a little more work and it is going to broaden everyone's creative by introducing everyone to the world of mixed media along with altered which of course everyone is familiar with.


For those who may not know what it is: Mixed media includes but is not limited to using things like -
Paints
Gesso
Gel Mediums
Molding Paste

But it is a simple as using glimmer mist on a tag or using game pieces and alcohol inks.Everyones take on it is different and I hope you enjoy all the creations. Be sure to become a follower on each blog and leave a comment to be eligible for the GRAND PRIZE which is pictured/listed below and GOOD LUCK to the winner!!

Mixed Media Kit including: Items to alter, Glitter/Embossing Powders, Chipboard Pieces, Clipboard, Journal Book , Embellies

THANK YOU MONICA!!!


close up of glitter/embossing powders


THANK YOU STEPHANIE!!!! 
Whimsical Stamp Set

THANK YOU JESSICA!!!


Now, for the good stuff...LOL :) If you arrived here from Nouel, YEAH! You are in the right spot...If you just stumbled upon my blog or are reading from e-mail or in your reader, please go to the beginning at Monica's blog and see all the WONDERFUL Mixed Media creations these ladies have made. You are sure to learn some new techniques and see some beautiful creations. On to my creation:

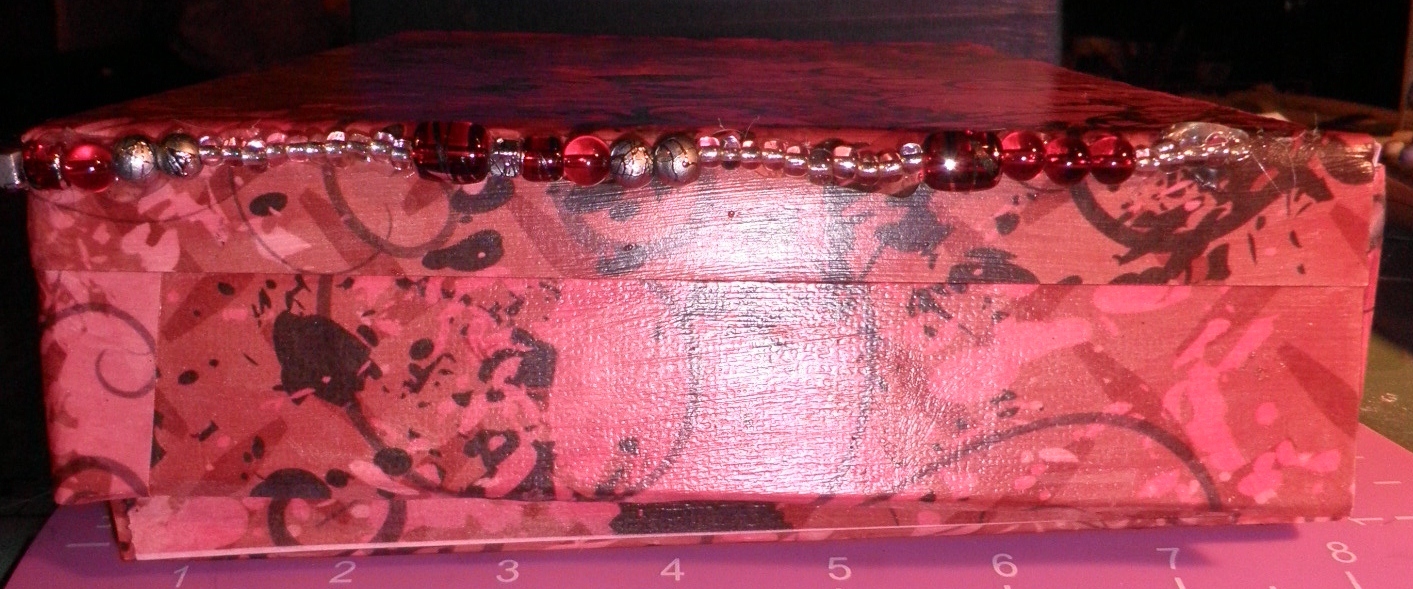
This is an altered "cigar" box that I built from artist's drawing board as a gift for my mom. She absolutely LOVES it, which makes me happy!


Charm on front of box, can also be worn on a necklace
Front of box, beads are on floral wire then hot-glued.

another view of front of box, paper is printed on my Imagine

box propped open, painted red inside using home-made glimmer paint

Inside of box, painted with homemade glimmer paint, you can see how I made the corners to support it

Top view of box, you can see the beads around the front & two sides.
side view, beads along edge, all along side.
I made this by cutting and scoring artists drawing board to build the body of the box. I then used a couple of adhesive methods to hold it together, I began with Quick Dry glue, however it doesn't hold the outside corners to my liking, so I use painter's tape as well...It covers well when I mod-podge over it.
This is what an "in-progress" box looks like with painter's tape & the first coat of Mod-Podge:

I then printed my paper from my Imagine & used Mod-Podge to adhere the paper to the box. I then used my home-made Glimmer paint to paint the inside of the box to compliment the outside. I matched the color almost exactly...again very proud of myself :D I then strung the beads onto silver floral wire(it is very strong & also flexible enough to bend into the shape I want) and then I used a hot glue gun to adhere the wired beads onto the box. I keep feeling like the box needs a little bit more to finish of the edges, however my mom is very happy with it, so I don't mess with her box. LOL.


I hope you have enjoyed my creation. I Love to receive comments! Don't forget to follow me & leave a comment to be entered in the grand prize drawing! Your next stop is your final destination at Creations Etc. Please be sure to stop in & check out all we have to offer. It is a wonderful place to spend some time, get inspiration & share your creativity.


Monica - http://scraps2treasure.blogspot.com/
Alina - http://neverstopscrapping.blogspot.com/
Julie - http://jk-littlebitofbling.blogspot.com/
Melissa H.-http://timeweavers.wordpress.com
Kristy - http://scraptasticalkreations.blogspot.com
Sylvia- www.bellascrapbookdesigns.blogspot.com
Liz -http:// www.scrapiliciousLife.blogspot.com
Paula - http://preciouspagesbypaula.blogspot.com/
Theresa - http://scrappinginheels.blogspot.com
Evila - http://www.frenchconnectiondesigns.blogspot.com/
Nouel - royalmidnightcraftcreations.blogspot.com
Michelle http://craftychelle.blogspot.com/                    <--- YOU ARE HERE
Creations Etc. - http://alwaysforever.ning.com/             <---GO HERE NEXT

1/28/12

Picture it Perfect Blog Hop

If you are here for the Princess Wedding Surprise Blog hop, scroll up or Click HERE for the post.


Hello and welcome to the Picture it Perfect Blog Hop hosted by Gill and Doris. Today's blog hop is a wonderful way to feature photography! You will get to see lots of wonderful photos along the way. I'm so glad you joined us today. If you arrived here from Janet you are in the right spot. If you are reading from your e-mail or just happened along my blog, please go to the Gill's Blog and check out all the wonderful photography and projects along the way. I'm SO EXCITED about this hop because I just LOVE photography & I'm getting to show off some of my skills.


Today I am sharing photos I took when I visited Oregon a few years ago. If you ever get to visit the Oregon coast, I HIGHLY recommend it, it is ABSOLUTELY BEAUTIFUL! The location is Cape Perpetua, given its' name because on a clear day you can see the entire coastline of the state from the point. Unfortunately, it was a hazy day & we couldn't see the ENTIRE state...We could still see quite a distance as you can see in a couple of my photos. None of these photos have been edited since I took them, these are the pure colors of the day & dramatic changes in clarity over about an hour's time. I hope that I can go back again some day.


Cape Perpetua, Oregon


Page Title-cut on Cricut from Mickey Font Cartridge
Look down the coastline, you can see for miles upon miles...it's endless


Waves crashing against rocks immediately below Cape. Stark contrast from the serene beach just a few hundred feet away

Miles upon miles of Oregon coastline viewed from Cape

Jetty just a couple miles down from Cape. I took a TON of photos of this area.

This town was just below the Cape on the northern side. I never made it down to this town, but from above it looked as if time had stood still. Very quaint fishing town.
With the exception of the village, all photos are looking south down the coast.


I hope you enjoyed my photography and my projects. I would love for you to leave me comments.
Thank you so much for hopping along today.Your next stop is Mandie.

Here is the entire line-up should you get lost along the way:


1 - Gill  - http://scrappincreationsbygillm.blogspot.com  (hostess)
2 - Doris - http://mybugandmecreate.blogspot.com (co-hostess)
3 - Linda - http://lindasimpsoncraftypieceofheaven.blogspot.com
4 - Linda - http://thefruitofmyhands.blogspot.com
5 - Lisa G - http://lisagarrow.blogspot.com
6 - Angie -  http://atuttletime.blogspot.com
7 - Janet S - http://ladyluvbug.blogspot.com/
8 - Michelle- http://www.craftychelle.blogspot.com
9- Mandie -  http/://mandiesscrappin.blogspot.com/
10 -  Lisa - http://handmadewithlove-lisa.blogspot.com

11/20/11

Let's Talk Turkey Blog Hop Day 2


Turkey Hop


Hello, and WELCOME to the the "Let's TALK TURKEY" Blog Hop!!  We're so excited that you could join us for this WONDERFUL two-day hop!!  Please be sure to visit BOTH days for maximum ideas, maximum FUN, and maximum chances to WIN!!  Our hostess, Amy at http://www.lovetocrop.com, has some SUPER prizes for a few hoppers, so be sure to check out all of those details on her blog!!

If you have hopped here from April N at http://www.curlsandgrins.blogspot.com/, then you have arrived at the perfect spot in the Turkey Coop!!  If you are just popping in to visit, please take a trip back to Amy's Blog (http://www.lovetocrop.com) to start at the beginning -- we've got a bunch of Gobble-Gobble-Goodness, you won't want to miss out on any of the FUN!!

Today is day Two and for my project I created a Thanksgiving Card. I plan to give this to a good friend of mine whom I will be visiting with while he is home for Thanksgiving. 


Front of Card

All paper is made by Colorbok and with the exception of the glitter paper began as white textured cardstock. The glitter paper is actually glitter cardstock made by Colorbok & in the "Earthtones" pack. I am consistently impressed with their lines, I use a lot of their iridescent papers as well, just not on this card today. The Card base was cut from the Close to My Heart Art Philospohy Cricut Cartridge(pg 44) at 7.5" I cut two bases so that it would be a sturdy card & the smooth side of the white cardstock would be exposed. I then trimmed the glitter paper down to fit the card base & rounded the corners with my Xacto corner rounder punch. All the adhesive used on this card was Xyron. I used my 1" & 5" sticker makers and my 12" Creatopia, what an AWESOME machine! The turkeys are from the Celebrate with Flourish Cricut Cartridge and cut at 3". I used all the layers for the turkey to give him the most dimension. All the colors of inks are Tim Holtz or Adorondak. The body is Tim Holtz Distressed Walnut Stain, the next layer down where you see the swirl is Fired Brick, The blue swirls are a mix of Adorondak Metallic Mixatives in Silver and Adorondak Alcohol ink in Stream, The shadow behind the turkeys is Adorondak in Wild Plum. The little "fence" border behind the turkeys was made with one of the  Mavy Uchida punches that you can switch out the cartridges for different designs. I had purchased it, tried it out on plain white cardstock(giving me a few pieces of border in my stash) and then returned it because I decided I didn't need to spend that much money on it...Now I wish I had kept it...I want more of that border! I used Tim Holtz Distressed Ink in Peeled Paint on it.  The little thought/speech bubble is actually a card cut from the Close to My Heart Cartridge at 2" cut in half and then inked with Adorondak Alcohol Ink in Latte. I used 3-D glue dot to adhere the thought bubble. I then used Martha Stewart alphabet stamps(don't remember the name of the line) and Staz-On ink in Forest Green for the Sentiment.

Inside of Card


The same papers and inks were used on the inside. I used my Spellbinders Dies in my Sizzix Big Shot to cut and emboss the layers. Again I used Adorondak inks in Latte and the combination with Metallic Mixatives and Stream. The sentiment is with the same Martha Stewart alphabet set & Staz-On Forest Green ink.

I hope you've enjoyed my card. I enjoyed making it. This is only the second card I've ever completed. I'm not a proficient card maker, but I'm very proud of it.


Thank you again for visiting, for the next stop in the Turkey Coop, please hop to Kristy at http://www.scraptasticalkreations.blogspot.com/

Here is the entire hop lineup in case you get lost along the way.
1. Amy ~ http://www.lovetocrop.com/
2. Shawnee ~ http://www.blessedonthebrightside.com/
3. Anita ~ http://www.anitaandbugs.blogspot.com/
4. Ashley ~ http://theglamoroussideofscrapping.blogspot.com
5. Linda ~ http://www.lindascreativity.blogspot.com/
6. Colleen ~ http://www.cbcscrapbooking.blogspot.com
7. Rhonda ~ http://scraphappenswithrhonda.blogspot.com/
8.Theresa ~ http://www.thescrapbookingqueen.com/
9.April ~ http://www.curlsandgrins.blogspot.com
10.Michelle ~ http://www.craftychelle.blogspot.com/     <-------YOU ARE HERE
11.Kristy ~ http://www.scraptasticalkreations.blogspot.com/    <------GO HERE NEXT
12.Sher ~ http://www.patternsbysher.blogspot.com
13. Robin ~ http://scrapandchat.blogspot.com
14. Melissa ~ http://acreativejourneywithmelissa.blogspot.com/
15. Jamie ~ http://myamusinglife.blogspot.com/
16. Janet ~ http://createatdreamscrapbooks.blogspot.com/
17. Jessica ~ http://scrappyluvs.blogspot.com/
18. Nancy ~ http://blog.fancywithnancy.com/

11/19/11

Let's Talk Turkey Blog Hop


Turkey Hop


Hello, and WELCOME to the the "Let's TALK TURKEY" Blog Hop!!  We're so excited that you could join us for this WONDERFUL two-day hop!!  Please be sure to visit BOTH days for maximum ideas, maximum FUN, and maximum chances to WIN!!  Our hostess, Amy at http://www.lovetocrop.com, has some SUPER prizes for a few hoppers, so be sure to check out all of those details on her blog!!

If you have hopped here from April N at http://www.curlsandgrins.blogspot.com/, then you have arrived at the perfect spot in the Turkey Coop!!  If you are just popping in to visit, please take a trip back to Amy's Blog (http://www.lovetocrop.com) to start at the beginning -- we've got a bunch of Gobble-Gobble-Goodness, you won't want to miss out on any of the FUN!!

Today is day one and for my project I created a fairly simple little tag to share with you. It can be used to put on a gift or to exchange with someone or just to display. I plan to display mine as I love to decorate for holidays & I seem to have a shortage of Thanksgiving Decorations. 


Please meet TOM the Turkey Tag :) 


To make this tag I used the turkey that I found on page 49 the Stretch Your Imagination cartridge. I cut it(and all the corresponding layers) at 3". I used white cardstock so that I could color it as I wanted. The head, gobbler and feet are done with Adorondak paint dabbers in bright colors(Red Pepper & Sunshine Yellow). The body is done in multiple applications of Tim Holtz Distressed Stamp Ink in Frayed Burlap. I used Tim Holtz Distress ink for Tom's tail feathers as well. That color is Spiced Marmalade. The shadow behind Tom is Tim Holtz Distress Peeled Paint. Take note that Tom's little wing flaps open back and forth, not that he could actually fly bc we all know that turkeys CAN'T fly, but he likes to show it off!  The tag I cut at 4.5 inches, from the Sentimentals cartridge. I used a small American Craft's stamp that is actually a Victorian flourish for the background. I've used this technique before & love how it comes out. I used Tim Holtz Distress Walnut Stain for this stamp. To finish off the tag I *attempted* to trace Tom the turkey with embossing powder. I used my embossing pen & Martha Stewart embossing powder. Some parts of it came out the way I wanted, others I'm not thrilled with, but it's there...So here's Tom the Turkey Tag. :) Hope you've enjoyed and please come back tomorrow to see even more turkey fun! 


Thank you again for visiting, for the next stop in the Turkey Coop, please hop to Kristy at 
http://www.scraptasticalkreations.blogspot.com/

Here is the entire hop lineup in case you get lost along the way.
1. Amy ~ http://www.lovetocrop.com/
2. Shawnee ~ http://www.blessedonthebrightside.com/
3. Anita ~ http://www.anitaandbugs.blogspot.com/
4. Ashley ~ http://theglamoroussideofscrapping.blogspot.com
5. Linda ~ http://www.lindascreativity.blogspot.com/
6. Colleen ~ http://www.cbcscrapbooking.blogspot.com
7. Rhonda ~ http://scraphappenswithrhonda.blogspot.com/
8.Theresa ~ http://www.thescrapbookingqueen.com/
9.April ~ http://www.curlsandgrins.blogspot.com
10.Michelle ~ http://www.craftychelle.blogspot.com/     <-------YOU ARE HERE
11.Kristy ~ http://www.scraptasticalkreations.blogspot.com/    <------GO HERE NEXT
12.Sher ~ http://www.patternsbysher.blogspot.com
13. Robin ~ http://scrapandchat.blogspot.com
14. Melissa ~ http://acreativejourneywithmelissa.blogspot.com/
15. Jamie ~ http://myamusinglife.blogspot.com/
16. Janet ~ http://createatdreamscrapbooks.blogspot.com/
17. Jessica ~ http://scrappyluvs.blogspot.com/
18. Nancy ~ http://blog.fancywithnancy.com/

11/16/11

Memories in Tyme Thanksgiving Blog Hop


Welcome to the Thanksgiving Blog Hop!!


Thanksgiving Hop


We're so happy you could join us for this super-fun hop showcasing cards, layouts and projects that feature everything to be thankful for!! You'll find an array of ideas throughout the hop -- From decorations to gift ideas and more, we hope you'll enjoy each and every project along the way!!

If you've hopped over from Jearise, then you are in the right place!! If you've just popped in to visit my blog or are reading this via email and you'd like to join our Trick-or-Treat FUN, then please CLICK HERE to start at the beginning with Lynda's blog because... It's always a TREAT to start at the start!! :) This is a TWO-DAY hop, so be sure to catch both days for maximum ideas (you'll find the entire line-up below my post)!!

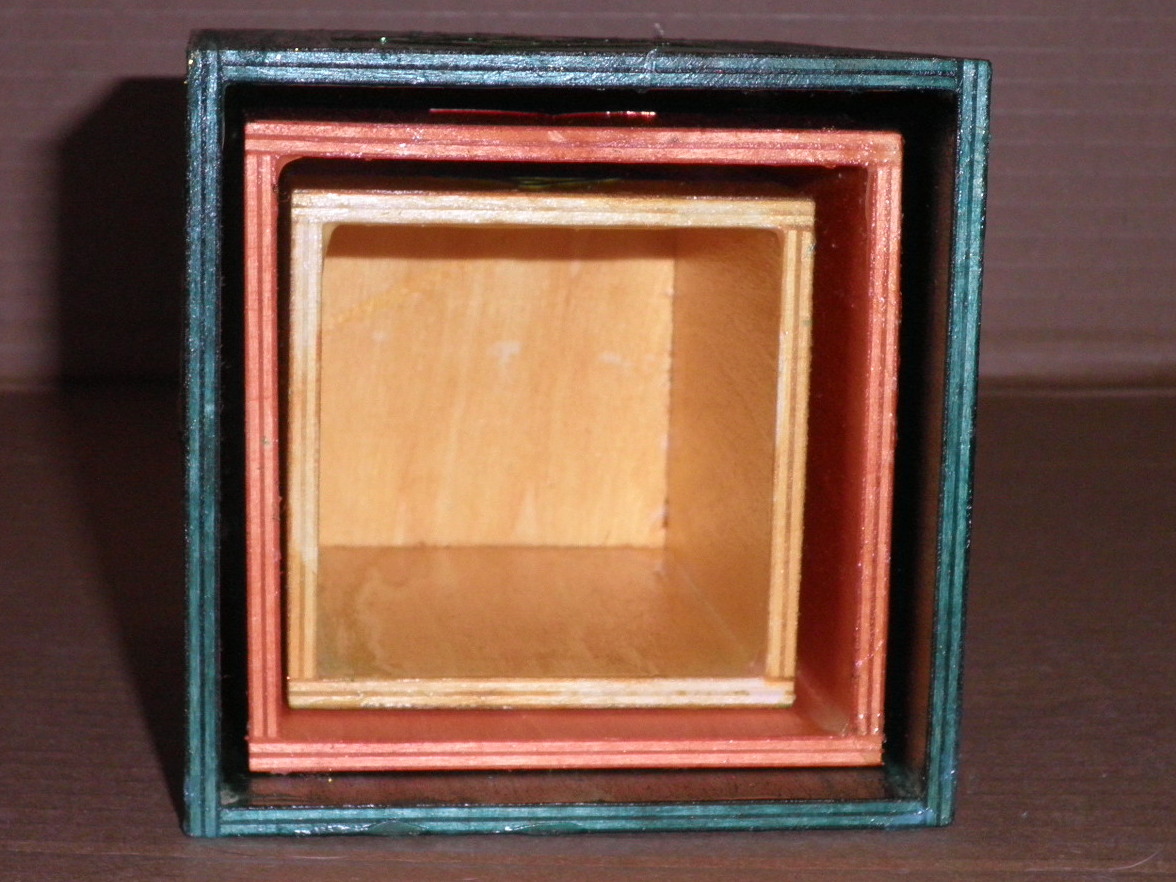
For the hop today, I've created decorative nesting canisters. I used my Cricut machine to cut the deisgns. The canisters were bare, unfinished wood. I made up my own custom colors of inks using a combination of Tim Holtz and another brand(sorry I forgot the name) inks to stain the wood. I then cut the the leaves out using several Cricut cartridges(I'll add these later), the sizes are 3" 3.5" and 4" respectively for the canisters. I then used Tim Holtz distress inks in ______ Colors(I'll add these later) to ink the leaves. After the leaves were sufficiently colored, I used a variety of brands of stickles to add glitter the leaves. I then used Mod Podge to adhere the individual leaves to the boxes and coated the sides of the boxes with Mod Podge.

I chose to do these canisters because we love to decorate for all the holidays AND my mom collects canisters. I thought she would enjoy a hand made set for her collection. These canisters fit nicely with our fall and Thanksgiving decorations even though we've all been a little too sick and too busy with doctor's appointments to be able to decorate this year. I hope you all enjoy my canisters, I enjoyed making them.  

Nesting Boxes


Looking in on themselves nested  together
Canisters stacked on top of each other, first side
Canisters stacked on top of each other, side 2
Canisters stacked on each other, side 3
Canisters stacked on each other, fourth side
Lids underneath
Lids on Top

Lids on top


Thank you again for checking out my project... and Remember to visit all the stops for more chances to WIN (simply follow the sneak peek links below)!!

Now that you're done here, be sure to hop to Jen  next. Below you will find the links for BOTH days of the hop so you'll be sure not to miss a THING!!

DAY ONE (November 15):


DAY TWO (November 16):